Has your Millar Catheter suddenly stopped behaving how it’s supposed to? E.g., your catheter won’t zero, or your pressure signal is out of range? Don’t worry - we're here to help!
Below, we have created a short guide covering the three most common problems you might encounter when using a Millar Research Catheter and the corrective actions to take. Plus - we have included some handy tips on how to avoid them from happening in the first place!
#1 Pressure signal drift or pressure signal out of range
More often than not, a drifting pressure signal is due to foreign material on the sensor diaphragm or failing to properly prepare the catheter before inserting it into the biological environment.
Corrective actions:
To correct for a drifting or out of range signal, you will want to clean your catheter with an approved cleaner or disinfectant. Please be aware that some chemicals such as hydrogen peroxide, alcohols, or cleaning agents containing surfactants can damage the catheter materials.
For a list of approved cleaners and disinfectants, as well as detailed instructions for cleaning, soaking, drying, and sterilizing your catheter - see the instructions for use document provided with your catheter.
After cleaning, make sure you rinse the catheter to prevent any residual cleaning solution from crystallizing on the surface.
Once cleaned and rinsed, you will need to soak the catheter in sterile water or saline solution at 37 degrees (or at the expected operating temperature) for at least 30 minutes before trying the procedure again. See our tips for presoaking your catheter below.
How to avoid this happening again:
1. Inspect your catheter before use
Before each use, inspect the sensor under a microscope and carefully wipe away any dust or small fibers that may be visible. Even a small amount of debris can cause a signal offset.
2. Always presoak your catheter tip!
Before using your catheter for recording pressure signals, it’s important to presoak the catheter tip in saline or distilled water at body temperature for at least 30 minutes prior to use.
Presoaking your catheter helps prepare the pressure sensor diaphragm for the "wet" biological environment and prevent pressure signal drift and negative pressure recordings. The presoak can be done by gently inserting the catheter tip into a beaker, dish, or through the tip of a syringe.
3. Clean your catheter after each use
It’s important to clean your catheter immediately after use to avoid foreign material drying on the sensor and interfering with the signal. If you can’t clean it immediately, then you should place the catheter tip in saline or water upon removal so it doesn't dry out - a dried-out catheter is very difficult to clean later on.
What’s more - having a good cleaning regime in place will help extend the life of each of your catheters and save you $'s in the long run!
#2 The pressure sensor won't balance or zero
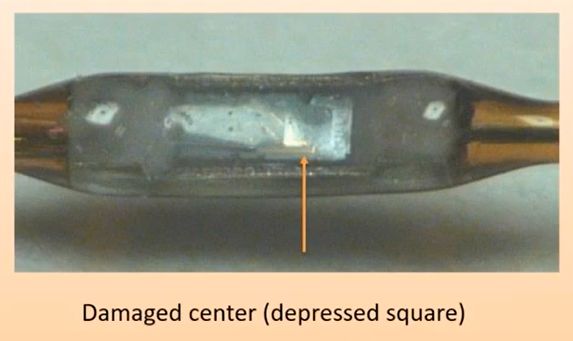
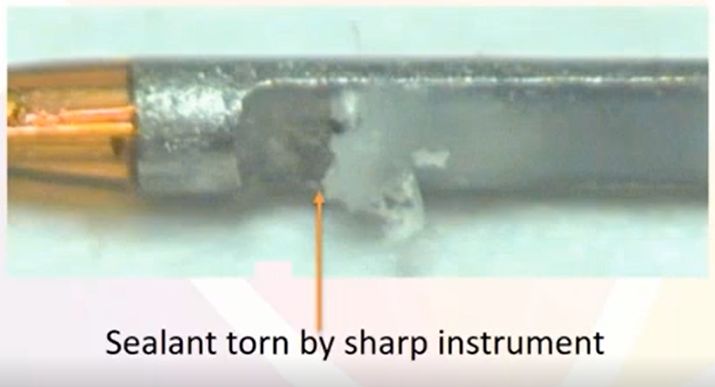
Another potential problem that you may face is a pressure sensor that won't balance or zero. This can be caused by the presence of moisture in the connectors or by physical damage, such as damage to the internal wires or a fractured string gauge. You can inspect your catheter for physical damage under a microscope - some things to look out for are a depressed sensor diaphragm or damage to the protective sensor sealant as shown in the photos below.
Corrective actions:
Unfortunately, if the internal wires or sensors are physically damaged, you may need to substitute the catheter for a new one!
How to avoid this happening again:
1. Handle your catheter with care
We cannot stress enough how important it is to have good laboratory practices in place when handling your catheters. While they are made from high-quality materials, they are still very fragile!
It's important to be mindful of how you are handling your catheter to avoid damaging the pressure sensor or volume electrodes. Avoid applying direct pressure to the sensor diaphragm with fingertips or forceps and be mindful of where the sensor is located within your preparation and to keep instruments etc. away from this area.
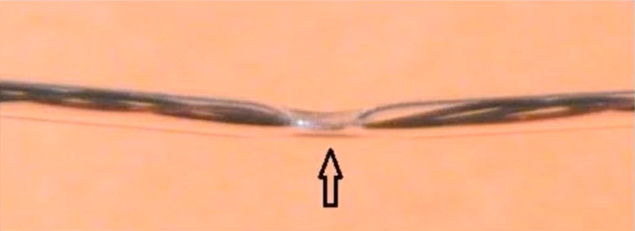
Catheter squashed by forceps
For more information on handling procedures and operating instructions - check out the instructions for use document supplied with your catheter.
2. Protect your catheter with foam when not in use
After you have finished using your catheter (and have cleaned it!), it should be placed back in the protective foam case that it came in, to avoid physical damage during handling or storage.
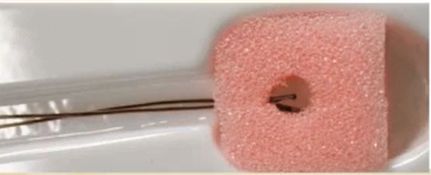
Catheter in protective foam
#3 A noisy or erratic volume signal
Lastly, you may experience a noisy or erratic volume signal, which is most likely due to damage to the electrodes or the catheter body.
Corrective actions:
Again, if you have physically damaged the internal components of the catheter (e.g. sensors or wires), you may need to swap it out for a new one. Unfortunately, once the damage is done, it can be very difficult to fix.
How to avoid this happening again:
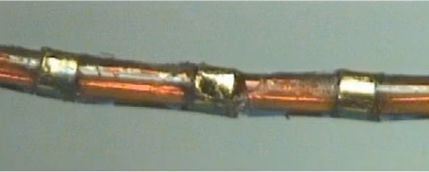
A damaged volume electrode
See the above suggestions for how to avoid physical damage when handling your catheter and how to protect it when not in use - or you can download Millar's Best Practice Tips for Pressure and Pressure-Volume Catheters by filling out the form below!
Are you experiencing another issue not covered above?
Unsure if it's your catheter failing or a problem with your data acquisition hardware e.g. your Bridge Amp, PowerLab, C Series Interface or MPVS Ultra PV Unit? Contact your nearest ADInstruments technical support specialist today - we’re here to help!
For access to more information and videos regarding catheter use and care, surgical procedures, and publications referencing Millar Mikro-Tip catheters, please register for a free account on Millar’s Knowledge Center.
Additional Resources:
- Pressure-volume catheter placement in the left ventricle – Carotid vs. Apical approach
- Expert tips for measuring PV loops in mice
- Understanding Ventricular Pressure-Volume Catheter Calibrations and Experimental Design
- PV Loop 2.5 - For left and right ventricular PV Loop analysis
- Calibration and Setup of your MPVS Ultra
- Invasive Blood Pressure – fundamentals and best practices for preclinical research
Owners guides:
- Pressure Catheter Owners Guide
- Pressure Volume Catheter Owners Guide
- Pressure Volume Mini Catheter Owners Guide
Millar for Research – exclusively available from ADInstruments
ADInstruments are proud to be the exclusive global distributors of Millar Mikro-Tip® pressure catheters and associated hardware for ventricular pressure-volume and invasive pressure recording.